1.(Didact)一个DIY教程:创建你自己的react
[更新]这个系列从老的react架构写起,你可以跳过前面直接到,使用新的fiber架构重写的:文章
[更新2]听Dan的没错,我是认真的☺
这篇深入fiber架构的文章真的很棒。 — @dan_abramov
1.1 引言
很久以前,当学数据结构和算法时,我有个作业就是实现自己的数组,链表,队列,和栈(用Modula-2语言)。那之后,我再也没有过要自己来实现链表的需求。总会有库让我不需要自己重造轮子。
所以,那个作业还有意义吗?当然,我从中学到了很多,知道如何合理使用各种数据结构,并知道根据场景合理选用它们。
这个系列文章以及对应的(仓库)的目的也是一样,不过要实现的是一个,我们比链表使用更多的东西:React
我好奇如果不考虑性能和设备兼容性,POSIX(可移植操作系统接口)核心可以实现得多么小而简单。 — @ID_AA_Carmack
我对react也这么好奇
幸运的是,如果不考虑性能,调试,平台兼容性等等,react的主要3,4个特性重写并不难。事实上,它们很简单,甚至只要不足200行代码
这就是我们接下来要做的事,用不到200行代码写一个有一样的API,能跑的React。因为这个库的说教性(didactic)特点,我们打算就称之为Didact
用Didact写的应用如下:
    const stories = [
  { name: "Didact introduction", url: "http://bit.ly/2pX7HNn" },
  { name: "Rendering DOM elements ", url: "http://bit.ly/2qCOejH" },
  { name: "Element creation and JSX", url: "http://bit.ly/2qGbw8S" },
  { name: "Instances and reconciliation", url: "http://bit.ly/2q4A746" },
  { name: "Components and state", url: "http://bit.ly/2rE16nh" }
];

class App extends Didact.Component {
  render() {
    return (
      <div>
        <h1>Didact Stories</h1>
        <ul>
          {this.props.stories.map(story => {
            return <Story name={story.name} url={story.url} />;
          })}
        </ul>
      </div>
    );
  }
}

class Story extends Didact.Component {
  constructor(props) {
    super(props);
    this.state = { likes: Math.ceil(Math.random() * 100) };
  }
  like() {
    this.setState({
      likes: this.state.likes + 1
    });
  }
  render() {
    const { name, url } = this.props;
    const { likes } = this.state;
    const likesElement = <span />;
    return (
      <li>
        <button onClick={e => this.like()}>{likes}<b>❤️</b></button>
        <a href={url}>{name}</a>
      </li>
    );
  }
}

Didact.render(<App stories={stories} />, document.getElementById("root"));
这就是我们在这个系列文章里要使用的例子。效果如下
我们将会从下面几点来一步步添加Didact的功能:
这个系列暂时不讲的地方:
- Functional components
- Context(上下文)
- 生命周期方法
- ref属性
- 通过key的调和过程(这里只讲根据子节点原顺序的调和)
- 其他渲染引擎 (只支持DOM)
旧浏览器支持
你可以从react实现笔记,Paul O’Shannessy的这个youtube演讲视频,或者react仓库地址,找到更多关于如何实现react的细节.
2.渲染dom元素
2.1 什么是DOM
开始之前,让我们回想一下,我们经常使用的DOM API
// Get an element by id const domRoot = document.getElementById("root"); // Create a new element given a tag name const domInput = document.createElement("input"); // Set properties domInput["type"] = "text"; domInput["value"] = "Hi world"; domInput["className"] = "my-class"; // Listen to events domInput.addEventListener("change", e => alert(e.target.value)); // Create a text node const domText = document.createTextNode(""); // Set text node content domText["nodeValue"] = "Foo"; // Append an element domRoot.appendChild(domInput); // Append a text node (same as previous) domRoot.appendChild(domText);注意到我们设置元素的属性而不是特性属性和特性的区别,只有合法的属性才可以设置。
2.2 Didact元素
我们用js对象来描述渲染过程,这些js对象我们称之为Didact元素.这些元素有2个属性,type和props。type可以是一个字符串或者方法。在后面讲到组件之前,我们先用字符串。props是一个可以为空的对象(不过不能为null)。props可能有children属性,这个children属性是一个Didact元素的数组。 我们将多次使用Didact元素,目前我们先称之为元素。不要和html元素混淆,在变量命名的时候,我们称它们为DOM元素或者dom(preact就是这么做的)
一个元素就像下面这样:
  const element = {
type: "div",
props: {
  id: "container",
  children: [
    { type: "input", props: { value: "foo", type: "text" } },
    { type: "a", props: { href: "/bar" } },
    { type: "span", props: {} }
  ]
}
};
对应描述下面的dom:
<div id="container"> <input value="foo" type="text"> <a href="/bar"></a> <span></span> </div>Didact元素和react元素很像,但是不像react那样,你可能使用JSX或者createElement,创建元素就和创建js对象一样.Didatc我们也这么做,不过在后面章节我们再加上create元素的代码
2.3 渲染dom元素
下一步是渲染一个元素以及它的children到dom里。我们将写一个render方法(对应于react的ReactDOM.render),它接受一个元素和一个dom 容器。然后根据元素的定义生成dom树,附加到容器里。
    function render(element, parentDom) {
    const { type, props } = element;
    const dom = document.createElement(type);
    const childElements = props.children || [];
    childElements.forEach(childElement => render(childElement, dom));
    parentDom.appendChild(dom);
  }
我们仍然没有对其添加属性和事件监听。现在让我们使用object.keys来遍历props属性,设置对应的值:
function render(element, parentDom) {
  const { type, props } = element;
  const dom = document.createElement(type);

  const isListener = name => name.startsWith("on");
  Object.keys(props).filter(isListener).forEach(name => {
    const eventType = name.toLowerCase().substring(2);
    dom.addEventListener(eventType, props[name]);
  });

  const isAttribute = name => !isListener(name) && name != "children";
  Object.keys(props).filter(isAttribute).forEach(name => {
    dom[name] = props[name];
  });

  const childElements = props.children || [];
  childElements.forEach(childElement => render(childElement, dom));

  parentDom.appendChild(dom);
}
2.4 渲染DOM文本节点
现在render函数不支持的就是文本节点,首先我们定义文本元素什么样子,比如,在react中描述\Foo\:
const reactElement = {
  type: "span",
  props: {
    children: ["Foo"]
  }
};
注意到子节点,只是一个字符串,并不是其他元素对象。这就让我们的Didact元素定义不合适了:children元素应该是一个数组,数组里的元素都有type和props属性。如果我们遵守这个规则,后面将减少不必要的if判断.所以,Didact文本元素应该有一个“TEXT ELEMENT”的类型,并且有在对应的节点有文本的值。比如:
const textElement = {
  type: "span",
  props: {
    children: [
      {
        type: "TEXT ELEMENT",
        props: { nodeValue: "Foo" }
      }
    ]
  }
};
现在我们来定义文本元素应该如何渲染。不同的是,文本元素不使用createElement方法,而用createTextNode代替。节点值就和其他属性一样被设置上去。
function render(element, parentDom) {
  const { type, props } = element;

  // Create DOM element
  const isTextElement = type === "TEXT ELEMENT";
  const dom = isTextElement
    ? document.createTextNode("")
    : document.createElement(type);

  // Add event listeners
  const isListener = name => name.startsWith("on");
  Object.keys(props).filter(isListener).forEach(name => {
    const eventType = name.toLowerCase().substring(2);
    dom.addEventListener(eventType, props[name]);
  });

  // Set properties
  const isAttribute = name => !isListener(name) && name != "children";
  Object.keys(props).filter(isAttribute).forEach(name => {
    dom[name] = props[name];
  });

  // Render children
  const childElements = props.children || [];
  childElements.forEach(childElement => render(childElement, dom));

  // Append to parent
  parentDom.appendChild(dom);
}
2.5 总结
我们现在创建了一个可以渲染元素以及子元素的render方法。后面我们需要实现如何创建元素。我们将在下节讲到如何使JSX和Didact很好地融合。
3.JSX和创建元素
3.1 JSX
我们之前讲到了Didact元素,讲到如何渲染到DOM,用一种很繁琐的方式.这一节我们来看看如何使用JSX简化创建元素的过程。
JSX提供了一些创建元素的语法糖,不用使用下面的代码:
const element = {
  type: "div",
  props: {
    id: "container",
    children: [
      { type: "input", props: { value: "foo", type: "text" } },
      {
        type: "a",
        props: {
          href: "/bar",
          children: [{ type: "TEXT ELEMENT", props: { nodeValue: "bar" } }]
        }
      },
      {
        type: "span",
        props: {
          onClick: e => alert("Hi"),
          children: [{ type: "TEXT ELEMENT", props: { nodeValue: "click me" } }]
        }
      }
    ]
  }
};
我们现在可以这么写:
const element = (
  <div id="container">
    <input value="foo" type="text" />
    <a href="/bar">bar</a>
    <span onClick={e => alert("Hi")}>click me</span>
  </div>
);
如果你不熟悉JSX的话,你可能怀疑下面的代码是否是合法的js--它确实不是。要让浏览器理解它,上面的代码必须使用预处理工具处理。比如babel.babel会把上面的代码转成下面这样:
const element = createElement(
  "div",
  { id: "container" },
  createElement("input", { value: "foo", type: "text" }),
  createElement(
    "a",
    { href: "/bar" },
    "bar"
  ),
  createElement(
    "span",
    { onClick: e => alert("Hi") },
    "click me"
  )
);
支持JSX我们只要在Didact里添加一个createElement方法。其他事的交给预处理器去做。这个方法的第一个参数是元素的类型type,第二个是含有props属性的对象,剩下的参数都是子节点children。createElement方法需要创建一个对象,并把第二个参数上所有的值赋给它,把第二个参数后面的所有参数放到一个数组,并设置到children属性上,最后返回一个有type和props的对象。用代码实现很容易:
function createElement(type, config, ...args) {
  const props = Object.assign({}, config);
  const hasChildren = args.length > 0;
  props.children = hasChildren ? [].concat(...args) : [];
  return { type, props };
}
同样,这个方法对文本元素不适用。文本的子元素是作为字符串传给createElement方法的。但是我们的Didact需要文本元素一样有type和props属性。所以我们要把不是didact元素的参数都转成一个'文本元素'
 const TEXT_ELEMENT = "TEXT ELEMENT";

function createElement(type, config, ...args) {
  const props = Object.assign({}, config);
  const hasChildren = args.length > 0;
  const rawChildren = hasChildren ? [].concat(...args) : [];
  props.children = rawChildren
    .filter(c => c != null && c !== false)
    .map(c => c instanceof Object ? c : createTextElement(c));
  return { type, props };
}

function createTextElement(value) {
  return createElement(TEXT_ELEMENT, { nodeValue: value });
}
我同样从children列表里过滤了null,undefined,false参数。我们不需要把它们加到props.children上因为我们根本不会去渲染它们。
3.2总结
到这里我们并没有为Didact加特殊的功能.但是我们有了更好的开发体验,因为我们可以使用JSX来定义元素。我已经更新了codepen上的代码。因为codepen用babel转译JSX,所以以/* @jsx createElement /开头的注释都是为了让babel知道使用哪个函数。
你同样可以查看github提交
下面我们将介绍Didact用来更新dom的虚拟dom和所谓的调和算法.
4.虚拟DOM和调和过程
到目前为止,我们基于JSX的描述方式实现了dom元素的创建机制。这里开始,我们专注于怎么更新DOM.
在下面介绍setState之前,我们之前更新DOM的方式只有再次调用render()方法,传入不同的元素。比如:我们要渲染一个时钟组件,代码是这样的:
   const rootDom = document.getElementById("root");

  function tick() {
    const time = new Date().toLocaleTimeString();
    const clockElement = <h1>{time}</h1>;
    render(clockElement, rootDom);
  }

  tick();
  setInterval(tick, 1000);
我们现在的render方法还做不到这个。它不会为每个tick更新之前同一个的div,相反它会新添一个新的div.第一种解决办法是每一次更新,替换掉div.在render方法的最下面,我们检查父元素是否有子元素,如果有,我们就用新元素生产的dom替换它:
    function render(element, parentDom) {

  // ...
  // Create dom from element
  // ...

  // Append or replace dom
  if (!parentDom.lastChild) {
    parentDom.appendChild(dom);
  } else {
    parentDom.replaceChild(dom, parentDom.lastChild);
  }
}
在这个小列子里,这个办法很有效。但在复杂情况下,这种重复创建所有子节点的方式并不可取。所以我们需要一种方式,来对比当前和之前的元素树之间的区别。最后只更新不同的地方。
4.1 虚拟DOM和调和过程
React把这种diff过程称之为调和过程,我们现在也这么称呼它。首先我们要保存之前的渲染树,从而可以和新的树对比。换句话说,我们将实现自己的DOM,虚拟dom.
这种虚拟dom的‘节点’应该是什么样的呢?首先考虑使用我们的Didact元素。它们已经有一个props.children属性,我们可以根据它来创建树。但是这依然有两个问题,一个是为了是调和过程容易些,我们必须为每个虚拟dom保存一个对真实dom的引用,并且我们更希望元素都不可变(imumutable).第二个问问题是后面我们要支持组件,组件有自己的状态(state),我们的元素还不能处理那种。
4.2 实例(instance)
所以我们要介绍一个新的名词:实例。实例代表的已经渲染到DOM中的元素。它其实是一个有着,element,dom,chilInstances属性的JS普通对象。childInstances是有着该元素所以子元素实例的数组。
注意我们这里提到的实例和Dan Abramov在react组件,元素和实列这篇文章提到实例不是一个东西。他指的是React调用继承于React.component的那些类的构造函数所获得的‘公共实例’(public instances)。我们会在以后把公共实例加上。
每一个DOM节点都有一个相应的实例。调和算法的一个目标就是尽量避免创建和删除实例。创建删除实例意味着我们在修改DOM,所以重复利用实例就是越少地修改dom树。
4.3 重构
我们来重写render方法,保留同样健壮的调和算法,但添加一个实例化方法来根据给定的元素生成一个实例(包括其子元素)
 let rootInstance = null;

function render(element, container) {
  const prevInstance = rootInstance;
  const nextInstance = reconcile(container, prevInstance, element);
  rootInstance = nextInstance;
}

function reconcile(parentDom, instance, element) {
  if (instance == null) {
    const newInstance = instantiate(element);
    parentDom.appendChild(newInstance.dom);
    return newInstance;
  } else {
    const newInstance = instantiate(element);
    parentDom.replaceChild(newInstance.dom, instance.dom);
    return newInstance;
  }
}

function instantiate(element) {
  const { type, props } = element;

  // Create DOM element
  const isTextElement = type === "TEXT ELEMENT";
  const dom = isTextElement
    ? document.createTextNode("")
    : document.createElement(type);

  // Add event listeners
  const isListener = name => name.startsWith("on");
  Object.keys(props).filter(isListener).forEach(name => {
    const eventType = name.toLowerCase().substring(2);
    dom.addEventListener(eventType, props[name]);
  });

  // Set properties
  const isAttribute = name => !isListener(name) && name != "children";
  Object.keys(props).filter(isAttribute).forEach(name => {
    dom[name] = props[name];
  });

  // Instantiate and append children
  const childElements = props.children || [];
  const childInstances = childElements.map(instantiate);
  const childDoms = childInstances.map(childInstance => childInstance.dom);
  childDoms.forEach(childDom => dom.appendChild(childDom));

  const instance = { dom, element, childInstances };
  return instance;
}
这段代码和之前一样,不过我们对上一次调用render方法保存了实例,我们也把调和方法和实例化方法分开了。
为了复用dom节点而不需要重新创建dom节点,我们需要一种更新dom属性(className,style,onClick等等)的方法。所以,我们将把目前用来设置属性的那部分代码抽出来,作为一个更新属性的更通用的方法。
function instantiate(element) {
  const { type, props } = element;

  // Create DOM element
  const isTextElement = type === "TEXT ELEMENT";
  const dom = isTextElement
    ? document.createTextNode("")
    : document.createElement(type);

  updateDomProperties(dom, [], props);

  // Instantiate and append children
  const childElements = props.children || [];
  const childInstances = childElements.map(instantiate);
  const childDoms = childInstances.map(childInstance => childInstance.dom);
  childDoms.forEach(childDom => dom.appendChild(childDom));

  const instance = { dom, element, childInstances };
  return instance;
}

function updateDomProperties(dom, prevProps, nextProps) {
  const isEvent = name => name.startsWith("on");
  const isAttribute = name => !isEvent(name) && name != "children";

  // Remove event listeners
  Object.keys(prevProps).filter(isEvent).forEach(name => {
    const eventType = name.toLowerCase().substring(2);
    dom.removeEventListener(eventType, prevProps[name]);
  });
  // Remove attributes
  Object.keys(prevProps).filter(isAttribute).forEach(name => {
    dom[name] = null;
  });

  // Set attributes
  Object.keys(nextProps).filter(isAttribute).forEach(name => {
    dom[name] = nextProps[name];
  });

  // Add event listeners
  Object.keys(nextProps).filter(isEvent).forEach(name => {
    const eventType = name.toLowerCase().substring(2);
    dom.addEventListener(eventType, nextProps[name]);
  });
}
updateDomProperties 方法删除所有旧属性,然后添加上新的属性。如果属性没有变,它还是照做一遍删除添加属性。所以这个方法会做很多无谓的更新,为了简单,目前我们先这样写。
4.4 复用dom节点
我们说过调和算法会尽量复用dom节点.现在我们为调和(reconcile)方法添加一个校验,检查是否之前渲染的元素和现在渲染的元素有一样的类型(type),如果类型一致,我们将重用它(更新旧元素的属性来匹配新元素)
function reconcile(parentDom, instance, element) {
  if (instance == null) {
    // Create instance
    const newInstance = instantiate(element);
    parentDom.appendChild(newInstance.dom);
    return newInstance;
  } else if (instance.element.type === element.type) {
    // Update instance
    updateDomProperties(instance.dom, instance.element.props, element.props);
    instance.element = element;
    return instance;
  } else {
    // Replace instance
    const newInstance = instantiate(element);
    parentDom.replaceChild(newInstance.dom, instance.dom);
    return newInstance;
  }
}
4.5 子元素的调和
现在调和算法少了重要的一步,忽略了子元素。子元素调和是react的关键。它需要元素上一个额外的key属性来匹配之前和现在渲染树上的子元素.我们将实现一个该算法的简单版。这个算法只会匹配子元素数组同一位置的子元素。它的弊端就是当两次渲染时改变了子元素的排序,我们将不能复用dom节点。
实现这个简单版,我们将匹配之前的子实例 instance.childInstances 和元素子元素 element.props.children,并一个个的递归调用调和方法(reconcile)。我们也保存所有reconcile返回的实例来更新childInstances。
function reconcile(parentDom, instance, element) {
  if (instance == null) {
    // Create instance
    const newInstance = instantiate(element);
    parentDom.appendChild(newInstance.dom);
    return newInstance;
  } else if (instance.element.type === element.type) {
    // Update instance
    updateDomProperties(instance.dom, instance.element.props, element.props);
    instance.childInstances = reconcileChildren(instance, element);
    instance.element = element;
    return instance;
  } else {
    // Replace instance
    const newInstance = instantiate(element);
    parentDom.replaceChild(newInstance.dom, instance.dom);
    return newInstance;
  }
}

function reconcileChildren(instance, element) {
  const dom = instance.dom;
  const childInstances = instance.childInstances;
  const nextChildElements = element.props.children || [];
  const newChildInstances = [];
  const count = Math.max(childInstances.length, nextChildElements.length);
  for (let i = 0; i < count; i++) {
    const childInstance = childInstances[i];
    const childElement = nextChildElements[i];
    const newChildInstance = reconcile(dom, childInstance, childElement);
    newChildInstances.push(newChildInstance);
  }
  return newChildInstances;
}
4.6 删除Dom节点
如果nextChildElements数组比childInstances数组长度长,reconcileChildren将为所有子元素调用reconcile方法,并传入一个undefined实例。这没什么问题,因为我们的reconcile方法里if (instance == null)语句已经处理了并创建新的实例。但是另一种情况呢?如果childInstances数组比nextChildElements数组长呢,因为element是undefined,这将导致element.type报错。
这是我们并没有考虑到的,如果我们是从dom中删除一个元素情况。所以,我们要做两件事,在reconcile方法中检查element == null的情况并在reconcileChildren方法里过滤下childInstances
function reconcile(parentDom, instance, element) {
  if (instance == null) {
    // Create instance
    const newInstance = instantiate(element);
    parentDom.appendChild(newInstance.dom);
    return newInstance;
  } else if (element == null) {
    // Remove instance
    parentDom.removeChild(instance.dom);
    return null;
  } else if (instance.element.type === element.type) {
    // Update instance
    updateDomProperties(instance.dom, instance.element.props, element.props);
    instance.childInstances = reconcileChildren(instance, element);
    instance.element = element;
    return instance;
  } else {
    // Replace instance
    const newInstance = instantiate(element);
    parentDom.replaceChild(newInstance.dom, instance.dom);
    return newInstance;
  }
}

function reconcileChildren(instance, element) {
  const dom = instance.dom;
  const childInstances = instance.childInstances;
  const nextChildElements = element.props.children || [];
  const newChildInstances = [];
  const count = Math.max(childInstances.length, nextChildElements.length);
  for (let i = 0; i < count; i++) {
    const childInstance = childInstances[i];
    const childElement = nextChildElements[i];
    const newChildInstance = reconcile(dom, childInstance, childElement);
    newChildInstances.push(newChildInstance);
  }
  return newChildInstances.filter(instance => instance != null);
}
4.7 总结
这一章我们增强了Didact使其支持更新dom.我们也通过重用dom节点避免大范围dom树的变更,使didact性能更好。另外也使管理一些dom内部的状态更方便,比如滚动位置和焦点。
这里我更新了codepen,在每个状态改变时调用render方法,你可以在devtools里查看我们是否重建dom节点。
因为我们是在根节点调用render方法,调和算法是作用在整个树上。下面我们将介绍组件,组件将允许我们只把调和算法作用于其子树上。
5.组件和状态(state)
5.1 回顾
我们上一章的代码有几个问题:
- 每一次变更触发整个虚拟树的调和算法
- 状态是全局的
- 当状态变更时,我们需要显示地调用render方法
组件解决了这些问题,我们可以:
- 为jsx定义我们自己的‘标签’
- 生命周期的钩子(我们这章不讲这个)
5.2 组件类
首先我们要提供一个供组件继承的Component的基类。我们还需要提供一个含props参数的构造方法,一个setState方法,setState接收一个partialState参数来更新组件状态:
class Component {
  constructor(props) {
    this.props = props;
    this.state = this.state || {};
  }

  setState(partialState) {
    this.state = Object.assign({}, this.state, partialState);
  }
}
我们的应用里将和其他元素类型(div或者span)一样继承这个类再这样使用:\
function createPublicInstance(element, internalInstance) {
  const { type, props } = element;
  const publicInstance = new type(props);
  publicInstance.__internalInstance = internalInstance;
  return publicInstance;
}
除了创建公共实例外,我们保留了对触发组件实例化的内部实例(从虚拟dom)引用,我们需要当公共实例状态发生变化时,能够只更新该实例的子树。
class Component {
  constructor(props) {
    this.props = props;
    this.state = this.state || {};
  }

  setState(partialState) {
    this.state = Object.assign({}, this.state, partialState);
    updateInstance(this.__internalInstance);
  }
}

function updateInstance(internalInstance) {
  const parentDom = internalInstance.dom.parentNode;
  const element = internalInstance.element;
  reconcile(parentDom, internalInstance, element);
}
我们也需要更新实例化方法。对组件而言,我们需要创建公共实例,然后调用组件的render方法来获取之后要再次传给实例化方法的子元素:
function instantiate(element) {
  const { type, props } = element;
  const isDomElement = typeof type === "string";

  if (isDomElement) {
    // Instantiate DOM element
    const isTextElement = type === TEXT_ELEMENT;
    const dom = isTextElement
      ? document.createTextNode("")
      : document.createElement(type);

    updateDomProperties(dom, [], props);

    const childElements = props.children || [];
    const childInstances = childElements.map(instantiate);
    const childDoms = childInstances.map(childInstance => childInstance.dom);
    childDoms.forEach(childDom => dom.appendChild(childDom));

    const instance = { dom, element, childInstances };
    return instance;
  } else {
    // Instantiate component element
    const instance = {};
    const publicInstance = createPublicInstance(element, instance);
    const childElement = publicInstance.render();
    const childInstance = instantiate(childElement);
    const dom = childInstance.dom;

    Object.assign(instance, { dom, element, childInstance, publicInstance });
    return instance;
  }
}
组件的内部实例和dom元素的内部实例不同,组件内部实例只能有一个子元素(从render函数返回),所以组件内部只有childInstance属性,而dom元素有childInstances数组。另外,组件内部实例需要有对公共实例的引用,这样在调和期间,才可以调用render方法。
唯一缺失的是处理组件实例调和,所以我们将为调和算法添加一些处理。如果组件实例只能有一个子元素,我们就不需要处理子元素的调和,我们只需要更新公共实例的props属性,重新渲染子元素并调和算法它:
function reconcile(parentDom, instance, element) {
  if (instance == null) {
    // Create instance
    const newInstance = instantiate(element);
    parentDom.appendChild(newInstance.dom);
    return newInstance;
  } else if (element == null) {
    // Remove instance
    parentDom.removeChild(instance.dom);
    return null;
  } else if (instance.element.type !== element.type) {
    // Replace instance
    const newInstance = instantiate(element);
    parentDom.replaceChild(newInstance.dom, instance.dom);
    return newInstance;
  } else if (typeof element.type === "string") {
    // Update dom instance
    updateDomProperties(instance.dom, instance.element.props, element.props);
    instance.childInstances = reconcileChildren(instance, element);
    instance.element = element;
    return instance;
  } else {
    //Update composite instance
    instance.publicInstance.props = element.props;
    const childElement = instance.publicInstance.render();
    const oldChildInstance = instance.childInstance;
    const childInstance = reconcile(parentDom, oldChildInstance, childElement);
    instance.dom = childInstance.dom;
    instance.childInstance = childInstance;
    instance.element = element;
    return instance;
  }
}
这就是全部代码了,我们现在支持组件,我更新了codepen,我们的应用代码就像下面这样:
const stories = [
  { name: "Didact introduction", url: "http://bit.ly/2pX7HNn" },
  { name: "Rendering DOM elements ", url: "http://bit.ly/2qCOejH" },
  { name: "Element creation and JSX", url: "http://bit.ly/2qGbw8S" },
  { name: "Instances and reconciliation", url: "http://bit.ly/2q4A746" },
  { name: "Components and state", url: "http://bit.ly/2rE16nh" }
];

class App extends Didact.Component {
  render() {
    return (
      <div>
        <h1>Didact Stories</h1>
        <ul>
          {this.props.stories.map(story => {
            return <Story name={story.name} url={story.url} />;
          })}
        </ul>
      </div>
    );
  }
}

class Story extends Didact.Component {
  constructor(props) {
    super(props);
    this.state = { likes: Math.ceil(Math.random() * 100) };
  }
  like() {
    this.setState({
      likes: this.state.likes + 1
    });
  }
  render() {
    const { name, url } = this.props;
    const { likes } = this.state;
    const likesElement = <span />;
    return (
      <li>
        <button onClick={e => this.like()}>{likes}<b>❤️</b></button>
        <a href={url}>{name}</a>
      </li>
    );
  }
}

Didact.render(<App stories={stories} />, document.getElementById("root"));
使用组件使我们可以创建自己的'JSX标签',封装组件状态,并且只在子树上进行调和算法
 最后的codepen使用这个系列的所有代码。
6.Fiber:增量调和
我们正在写一个react复制品来理解react内部运行机制,我们称之为didact.为了简洁代码,我们只专注于主要的功能。首先我们讲到了怎么渲染元素并如何使jsx生效。我们写了调和算法来只重新渲染两次更新之间的发生的变化。然后我们添加了组件类和setState()
现在React16已经发布了,因为内部架构重构,所以大部分react代码都进行了重写。
这意味着一些我们之前不能通过旧的架构实现的功能现在可以完美实现了。
同时也意味着我们之前这个系列所写的代码全部没用了😁。
这篇文章里,我们将使用react的fiber架构重新实现didact.我们将模仿源码里的架构,变量,函数名。跳过一些我们不需要的公共API:
- Didact.createElement()
- Didact.render() (只支持dom rendering)
- Didact.createElement(有setState(),但没有context和生命周期方法)
如果你想直接看代码,可以移步更新的后的codepen示例和git仓库
首先解释我们为什么要重写代码
6.1 为什么使用Fiber
这里并不会覆盖fiber的方方面面,如果你想知道更多,请看资源列表
当浏览器主线程在忙着运行一些代码的时候,重要的短时任务却不得不等待主线程空闲下来才能得到执行。
为了说明这个问题,我写了个小demo(在手机上看效果明显).主线程必须每16ms有一刻空闲才能保证行星转起来。如果主线程卡在其他事情上,比如说200ms,你就会发现动画失帧,行星卡住直到主线程空闲。
是什么导致主线程繁忙而不能分配一点时间来确保动画顺滑和界面可相应?
记得之前实现的调和代码?一旦开始调和就不会停止。如果主线程这个时候需要干别的事,它就得等着。而且,因为调和过程基于太多的递归调用,很难让它可停止。所以,我们将采用一种新的数据结构,它让我们可以使用循环代替递归调用。
理解 React 如何遍历fiber Tree却不使用递归得花上一点时间。。。。
6.2 调度微任务(micro-task)
我们需要把任务拆分成小块任务,运行这些小任务需要一小段时间,让主线程先做高优先级的任务,然后回来完成这些未完成的任务。
我们将使用一个方法requestIdleCallback,该方法把一个回调方法推到队列中,下次等浏览器空闲的时候就会执行。同时它还包含一个deadline参数,表示我们剩下多少时间来运行代码。
主要工作都在performUnitOfWork方法里,我们将在这方法里写新的调和方法。这个方法将执行一段任务,然后返回下次需要继续执行的任务信息。
为了追踪这些任务我们将使用fiber
6.3 fiber数据结构
我们将为每个要渲染的组件创建一个fiber,nextUnitOfWork指向下一个我们将处理的fiber.performUnitOfWork会处理当前的fiber,并会在所有工作结束后返回一个新的fiber.不要担心,我会在后面详细解释。
一个fiber数据结构是什么样的?
其实它就是一个普通的javascript的对象。
我们将使用parent,child,和sibling属性来创建一颗fiber树。用它来描绘组件树。
stateNode是指向组件实例的引用。它可能是dom元素或者是用户自己定义的组件类
比如:

上面的例子可以看到,我们将支持3种不同的组件:
b,p,i的fiber代表主组件(host components),我们将用HOST_COMPONENT tag来标识它们,它们fiber的type是字符串(就是html元素的tag)。props就是这些元素的属性和事件监听
Foo fiber表示一个class组件,它的tag标识是CLASS_COMPONENT。它的type是指向用户继承Didact.Component定义的类。
div fiber代表主根节点(host root),它和主组件很像,因为它有一个stateNode的DOM元素。但作为树的根节点,它要被特殊对待。它的tag标识是HOST_ROOT.需要注意的是,这个fiber的stateNode就是传给Didact.render()的DOM节点
另一个很重要的属性是alternate。我们需要这个属性是因为大多数情况下,我们将有两个fiber树。一个表示我们已经渲染到dom的元素,我们称之为现有的树或者旧树。另一个是我们将要进行更新的树(调用setState或者Didact.render()时),我们称之为进行中的树
进行中的树和旧树之间不共享任何fiber节点。一旦我们创建完成进行中的树并完成了dom变更,进行中的树就变成了旧树。
所以我们使用alternate来关联进行的树和旧树对应的fiber节点。一个fiber和它的alternate共享一样的tag,type和stateNode.有时候,当我们渲染全新的内容时,fibers就会都没有alternate属性。
最后,我们需要effects列表和effectTag。当我们发现进行中的树需要更新DOM时,我们就把effectTag设置成PLACEMENT,UPDATE,DELETION。为了更方便地一次性提交所有的dom修改,我们保存一个包含所有fiber的列表(包括fiber的子树),每个fiber有一个effects属性,下面列了所有effectTag。
貌似一次性讲了太多概念了,不要担心,我们接下来就会代码实现fiber树
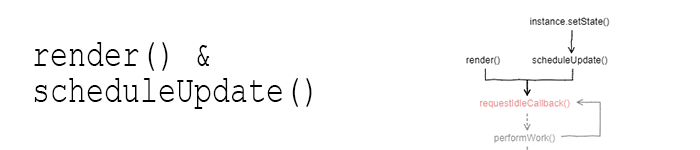
6.4 Didact的调用层次
为了理清代码逻辑,我们先来看一张图:

我们将从render()和setState()开始,先顺着由此到commitAllWork()结束的这条路线
6.5 之前的代码
我说过我们将重写之前的大部分代码,那开始先来看下哪些不需要重写
在JSX和创建元素里我们写了创建元素createElement()的代码,这个方法用来处理转换好的jsx.这部分我们不需要改,我们将保留相同的元素。如果你不了解什么是元素,请看前面的章节。
在实例,虚拟DOM和调和过程里,我们写了updateDomProperties()方法来更新dom节点的属性,另外createDomElement()方法我们也抽出来了,你可以在dom-uitls.js这个gist里找到这两个方法。
在组件和状态里,我们写了Component基类,现在我们来改一下,setState()调用scheduleUpdate(),createInstance()保存指向实例上fiber的一个引用
class Component {
  constructor(props) {
    this.props = props || {};
    this.state = this.state || {};
  }

  setState(partialState) {
    scheduleUpdate(this, partialState);
  }
}

function createInstance(fiber) {
  const instance = new fiber.type(fiber.props);
  instance.__fiber = fiber;
  return instance;
}
仅仅以这段代码开始,我们将把剩下的部分重头写一遍
除了Component类和createElement()方法,我们还有2个公共方法:render()和setState(),我们刚刚已经看到setState()只是调用scheduleUpdate()方法。
render()方法和scheduleUpdate()类似,它们接收一个更新任务并把任务推进队列:
// Fiber tags
const HOST_COMPONENT = "host";
const CLASS_COMPONENT = "class";
const HOST_ROOT = "root";

// Global state
const updateQueue = [];
let nextUnitOfWork = null;
let pendingCommit = null;

function render(elements, containerDom) {
  updateQueue.push({
    from: HOST_ROOT,
    dom: containerDom,
    newProps: { children: elements }
  });
  requestIdleCallback(performWork);
}

function scheduleUpdate(instance, partialState) {
  updateQueue.push({
    from: CLASS_COMPONENT,
    instance: instance,
    partialState: partialState
  });
  requestIdleCallback(performWork);
}
我们将使用updateQueue数组来保存待进行的变更任务,每调用render()或scheduleUpdate()就会推一个新的update对象进updateQueue队列,每个update信息都是不同的,我们将在后面的resetNextUnitOfWork()方法里看到具体细节。
update被推进队列之后,就触发一个对performWork()的延时调用。
const ENOUGH_TIME = 1; // milliseconds

function performWork(deadline) {
  workLoop(deadline);
  if (nextUnitOfWork || updateQueue.length > 0) {
    requestIdleCallback(performWork);
  }
}

function workLoop(deadline) {
  if (!nextUnitOfWork) {
    resetNextUnitOfWork();
  }
  while (nextUnitOfWork && deadline.timeRemaining() > ENOUGH_TIME) {
    nextUnitOfWork = performUnitOfWork(nextUnitOfWork);
  }
  if (pendingCommit) {
    commitAllWork(pendingCommit);
  }
}
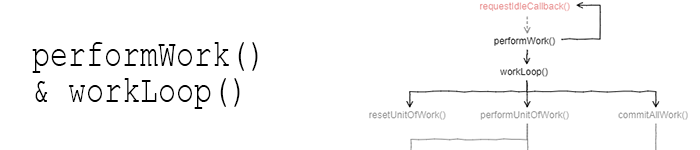
这里就是我们之前提到的使用performUnitOfWork()模式的地方
requestIdleCallback()调用目标方法并传入一个deadline参数。performWork()接收deadline参数并把它传给workLoop()方法。workLoop()返回后,performWork()检查是否还有剩余的任务,如果有的话,就延时调用自己。
workLoop()是监控时间的方法。如果deadline太小了,就会跳出工作循环并更新nextUnitOfWork,便于下次回来还能继续更新。
我们使用ENOUGH_TIME(1ms 的常量,react里也是这么设置的)来检查deadline.timeRemaining()的剩余时间是否够执行一个单元的任务。如果performUnitOfWork()花费时间比这多,这就超出了deadline的限制。deadline只是浏览器的建议时间,所以超过几毫米也不是那么严重
performUnitOfWork()将会创建对应更新的进行中的树,并且找出对应到dom的相应变更。这些都是增量做的,一次一个fiber.
performUnitOfWork()完成当前更新的所有任务后,它会返回null并把dom待更新的内容保存在pendingCommit中。最后,commitAllWork()从pendingCommit拿到effects并更新dom.
注意,commitAllWork()是在循环外调用的。performUnitOfWork()并不会去更新dom,所以把它们分开是没问题的。从另一个角度来说,commitAllWork()会变更dom,所以为了避免不稳定的UI,应该一次性完成。
我们还没说nextUnitOfWork哪来的.
接收一个update对象并把它转变成nextUnitOfWork的方法就是resetNextUnitOfWork()
function resetNextUnitOfWork() {
  const update = updateQueue.shift();
  if (!update) {
    return;
  }

  // Copy the setState parameter from the update payload to the corresponding fiber
  if (update.partialState) {
    update.instance.__fiber.partialState = update.partialState;
  }

  const root =
    update.from == HOST_ROOT
      ? update.dom._rootContainerFiber
      : getRoot(update.instance.__fiber);

  nextUnitOfWork = {
    tag: HOST_ROOT,
    stateNode: update.dom || root.stateNode,
    props: update.newProps || root.props,
    alternate: root
  };
}

function getRoot(fiber) {
  let node = fiber;
  while (node.parent) {
    node = node.parent;
  }
  return node;
}
resetNextUnitOfWork()首先从队列中取出第一个update对象。
如果update上有partialState,我们就把它保存在组件实例的fiber上。然后我们在调用组件的render()方法时就可以用了。
然后我们寻找老的fiber树的根节点。如果update来自第一次调用render()方法,就没有根fiber。所以跟fiber就是null。如果是后续的render调用,我们就会在DOM节点的_rootContainerFiber属性上找到跟fiber。但如果更新是来自于setState(),我们就只能通过向上查找fiber实例的父母节点,知道某个节点没有父母,那它就是根节点。
然后,我们把新的fiber赋给nextUnitOfWork,这个fiber就是进行中的树的根节点
如果我们没有旧的根节点,stateNode就会作为DOM节点传给render()方法.update对象上的newProps就作为props。update的children属性上就有传给render的另一个参数elements。alternate是null.
如果有旧的根节点,stateNode就是之前根节点上的DOM节点,如果newProps非null的话,newProps还是作为props,或者我们从之前的旧根节点上拷贝props,alternate就是旧根节点。
我们现在有了进行中树的根节点,下面我们来创建剩余部分。
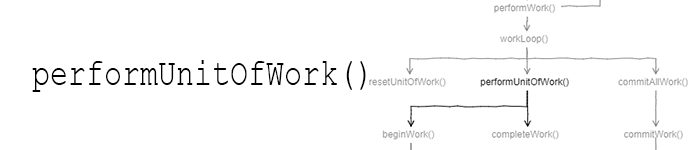
function performUnitOfWork(wipFiber) {
  beginWork(wipFiber);
  if (wipFiber.child) {
    return wipFiber.child;
  }

  // No child, we call completeWork until we find a sibling
  let uow = wipFiber;
  while (uow) {
    completeWork(uow);
    if (uow.sibling) {
      // Sibling needs to beginWork
      return uow.sibling;
    }
    uow = uow.parent;
  }
}
performUnitOfWork()遍历进行中的树。
我们调用beginWork() -来创建fiber的一个子节点-然后返回第一个子节点,使它成为nextUnitOfWork。
如果没有子节点,我们调用completeWork()并把兄弟节点作为nextUnitOfWork。
如果没有兄弟节点,我们不断调用completeWork(),向上遍历父母节点,直到找到有兄弟节点的节点(这个兄弟节点会成为nextUnitOfWork),这个过程可能会一直到根节点。
多次调用performUnitOfWork()会向下为每个fiber的第一个子fiber创建子节点,直到它找到一个fiber没有子节点。然后向右移到兄弟节点做同样的事,然后向上到叔伯节点,重复一样的事。(为了加深理解,我们可以在fiber-debugger上渲染几个组件看看)
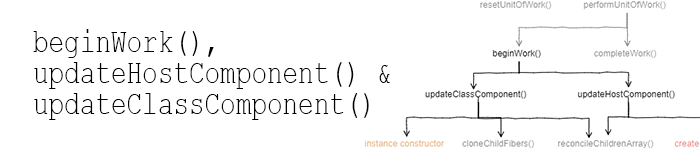
function beginWork(wipFiber) {
  if (wipFiber.tag == CLASS_COMPONENT) {
    updateClassComponent(wipFiber);
  } else {
    updateHostComponent(wipFiber);
  }
}

function updateHostComponent(wipFiber) {
  if (!wipFiber.stateNode) {
    wipFiber.stateNode = createDomElement(wipFiber);
  }
  const newChildElements = wipFiber.props.children;
  reconcileChildrenArray(wipFiber, newChildElements);
}

function updateClassComponent(wipFiber) {
  let instance = wipFiber.stateNode;
  if (instance == null) {
    // Call class constructor
    instance = wipFiber.stateNode = createInstance(wipFiber);
  } else if (wipFiber.props == instance.props && !wipFiber.partialState) {
    // No need to render, clone children from last time
    cloneChildFibers(wipFiber);
    return;
  }

  instance.props = wipFiber.props;
  instance.state = Object.assign({}, instance.state, wipFiber.partialState);
  wipFiber.partialState = null;

  const newChildElements = wipFiber.stateNode.render();
  reconcileChildrenArray(wipFiber, newChildElements);
}
beginWork()做两件事:
- 如果没有stateNode,创建一个
- 获得children组件并把它们传给reconcileChildrenArray()方法
因为这两个都要知道组件的类型,我们把方法拆成两个:updateHostComponent()和updateClassComponent()
updateHostComponent()处理host组件以及根组件。如果需要的话它创建一个新的DOM节点(单一的节点,没有子节点,也不插入Dom).然后使用fiber的props上的子元素作为参数,调用reconcileChildrenArray().
updateClassComponent()处理类组件实例,如果需要,调用类组件的构造函数创建实例。它也会更新实例的props和state,然后调用render()得到新的子节点
updateClassComponent()也会检测是否有必要调用render().这是个简单版的shouldComponentUpdate().如果发现不需要re-render,我们就把子树直接考给进行中的树,跳过调和。
现在我们有了newChildElements,我们来为进行中的树创建子fibers
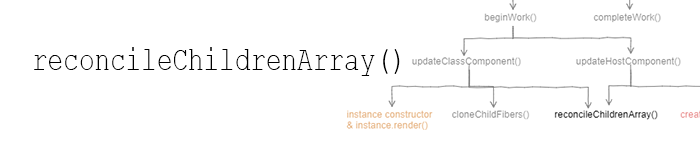
这里是库的核心,这里就是随着进行中的树增长,我们确定在提交阶段dom做哪些修改。
// Effect tags
const PLACEMENT = 1;
const DELETION = 2;
const UPDATE = 3;

function arrify(val) {
  return val == null ? [] : Array.isArray(val) ? val : [val];
}

function reconcileChildrenArray(wipFiber, newChildElements) {
  const elements = arrify(newChildElements);

  let index = 0;
  let oldFiber = wipFiber.alternate ? wipFiber.alternate.child : null;
  let newFiber = null;
  while (index < elements.length || oldFiber != null) {
    const prevFiber = newFiber;
    const element = index < elements.length && elements[index];
    const sameType = oldFiber && element && element.type == oldFiber.type;

    if (sameType) {
      newFiber = {
        type: oldFiber.type,
        tag: oldFiber.tag,
        stateNode: oldFiber.stateNode,
        props: element.props,
        parent: wipFiber,
        alternate: oldFiber,
        partialState: oldFiber.partialState,
        effectTag: UPDATE
      };
    }

    if (element && !sameType) {
      newFiber = {
        type: element.type,
        tag:
          typeof element.type === "string" ? HOST_COMPONENT : CLASS_COMPONENT,
        props: element.props,
        parent: wipFiber,
        effectTag: PLACEMENT
      };
    }

    if (oldFiber && !sameType) {
      oldFiber.effectTag = DELETION;
      wipFiber.effects = wipFiber.effects || [];
      wipFiber.effects.push(oldFiber);
    }

    if (oldFiber) {
      oldFiber = oldFiber.sibling;
    }

    if (index == 0) {
      wipFiber.child = newFiber;
    } else if (prevFiber && element) {
      prevFiber.sibling = newFiber;
    }

    index++;
  }
}
首先,我们知道newChildElements是个数组(不同于之前的调和算法,这里总是数组,这意味着我们可以在组件的render()方法里返回数组)
然后,我们对比旧fiber树的子节点和新的元素(我们对比fiber和元素)。旧fiber树的子节点就是wip.alternate的子节点。新元素就是wipFiber.props.children或者wipFiber.stateNode.render()返回的。
我们的调和算法通过匹配第一个旧fiber(wipFiber.alternate.child)和第一个子元素(elements[0]),第二个旧fiber(wipFiber.alternate.child.sibling)和第二个子元素(elements[1]),以此类推,每一个旧fiber-元素对:
如果旧fiber和元素有一样的type,好消息,我们可以保留之前的stateNode.我们基于旧的创建一个新的fiber。我们添加 UPDATE的effectTag。然后我们把新的fiber添加到进行中的树。
如果我们有一个元素和旧fiber的type不同,或者我们没有一个旧fiber(因为我们新的子元素比旧的子元素多),我们根据元素中的信息创建一个新的fiber。需要注意的是这个新的fiber将没有alternate和stateNode(我们将在beginWork里创建stateNode)。这个fiber的effectTag就是PLACEMENT。
如果旧fiber和元素有不同的type或者没有对应这个旧fiber的元素(因为我们旧的子元素比新的子元素多),我们给这个旧fiber标记DELETION。介于这个fiber不是进行中的树的一部分,我们需要把它加到wipFiber.effects,这样我们才不会失去跟踪。
和React不同的是我们没有用keys来做调和,这样如果子元素移动了位置我们就不知道了